How to Photograph the Northern Lights
Everything you need to know to photograph the northern lights — from choosing the right gear and location to camera settings, composition, and taking pictures when the aurora appears.
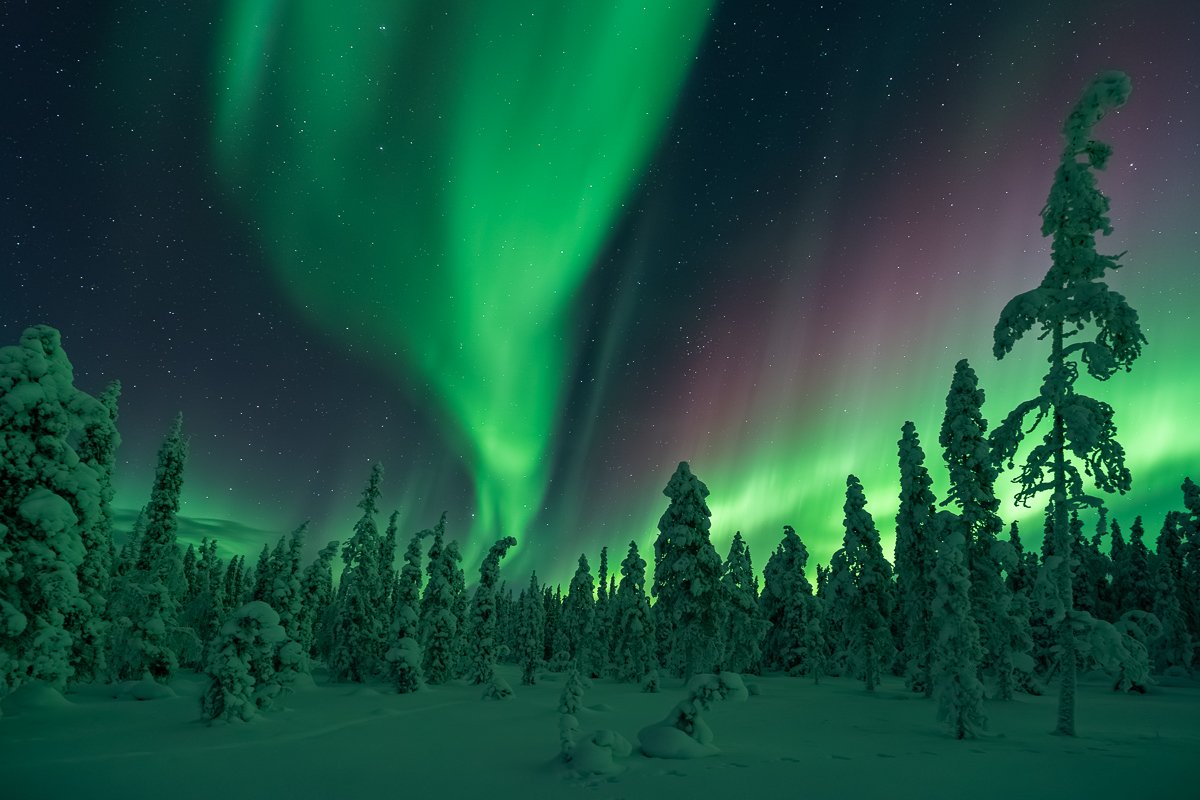
Pallastunturi, Finland. -25°C. f/2.8, 8sec, ISO3200.
Aurora photography is quite specific. It's long exposure photography, in the dark, often in the cold, and the aurora can move and change brightness very fast. Being well prepared in advance, knowing where to start, and what to do when the aurora appears in the sky really makes the difference — and allows you to come back from the trip with great images.
Gear
The most important piece of gear is a fast wide angle lens — preferably a focal length of 14mm for a full frame camera or 11mm for a crop sensor. A wide field of view lets you capture the aurora dancing across the sky and the foreground in a single frame. A wider angle also keeps stars relatively round compared to longer focal lengths at the same shutter speed, and gives you more depth of field — making it easier to keep both the foreground and the stars sharp.
As for aperture, wider is better. It lets more light reach the sensor, giving you cleaner, less noisy images and allowing faster shutter speeds to freeze the moving aurora. The trade-off is reduced depth of field — your foreground becomes out of focus. I personally use a 14–24mm f/2.8 lens on a full frame camera.
Most modern cameras are quite capable for aurora photography — the lens matters more than the body.
A sturdy tripod is the second essential — you'll often be shooting in windy conditions. A good headlamp is essential for hiking, moving around, and operating your gear in the dark. A lens heater prevents frost and condensation on the lens. And always carry spare batteries — aurora nights can be long and cold drains them fast.
In many locations — especially in Iceland and Norway — you'll need ice cleats on your boots. Getting good ones that attach securely and won't slide off is important. For some spots in deep snow you may also need snowshoes.
Cold weather tips
If you're heading to the classic aurora regions, cold conditions are the norm, especially in winter. Being prepared for them is what allows you to stay out long enough to get the shots.
Dress in extremely warm boots, hat, mittens, and layered clothing. Layers matter — remove your outer jacket when hiking to your spot to avoid sweating, which makes cold conditions much worse.
Keeping your hands warm is the most tricky and important task. Don't count on gloves if it's very cold — use mittens. The problem is that you usually can't operate your camera without removing them. What I do: I wear thin fleece gloves that give me good protection for a short time when operating the camera, and I put chemical hand warmers inside the mittens — they typically last 6–8 hours.
There are also a few obvious things worth mentioning. Have a substantial meal before heading out. Carry hot drinks and snacks. Avoid alcohol. If you start feeling cold, the only real solution is to keep moving. This shapes my workflow naturally — I don't stay at the same spot for hours. I change compositions within the same location or move to another one. It keeps me warm and often leads to more variety of images.
Keep spare batteries in a warm inner pocket — if you put them in the bag they will most likely become useless. When you replace a battery, put the dead one back in your warm inner pocket and it will recover. I always carry two batteries and rotate them in extremely cold conditions — no need for four.
When returning to a warm car or building, place your camera and lens in an insulated bag or simply a plastic bag until they acclimatise — this prevents condensation damage.
Choosing the right location
Finding the right location before the night is one of the most important things you can do. There is almost no way to explore a new spot and find a good composition in the dark — unless there is bright moonlight and a white winter landscape. If you're searching for a composition at night for the first time on a spot, you're wasting time that should be spent taking pictures.
I use Google Maps and satellite imagery to explore locations before visiting, then walk the ground myself during the day to find compositions that work. The best approach is to have several alternative spots within your reach — this also gives you options depending on where the sky is clearest on any given night. I always think about possible compositions depending on where in the sky the aurora may appear.
Open horizon and what to avoid
If the forecast suggests low activity you may expect aurora only above the northern horizon — so what sits just above the horizon matters enormously. Look for locations with an open view toward the north, northeast, and northwest. Pay attention to what might block the aurora if it stays low in the sky. Dense forest can look beautiful but completely hide the aurora above the horizon. Tall mountains close to your position can do the same.
Reading the forecast before choosing your composition
If the forecast suggests strong activity with aurora overhead or in the south, think about spots that allow compositions in different directions, not just north-facing ones. It's not always easy to predict, but there is a hint. Early in the night, check for a faint aurora bow stretching east to west. If it sits just above the northern horizon, conditions are ordinary. But if it's overhead or extending toward the south, that's a strong signal that the aurora may soon appear high in the sky. I always notice this and use it to decide which composition to choose next.
Light pollution
The aurora is much brighter than the Milky Way — you don't need a perfectly dark sky to photograph it. But light pollution still affects your images.
Heavy light pollution from cities creates a glow that washes out the dimmer parts of the aurora and reduces colour and detail. Use the light pollution map to find areas with reasonably dark sky — green, blue, or grey areas on the map are good targets.
Even in a relatively dark area, light from small towns can illuminate low clouds in a way that doesn't look good. If the forecast shows partly cloudy conditions, look for a spot where illuminated clouds won't enter your frame.
Car headlights on a moonless night are extremely bright and can ruin a shot. Avoid locations with night traffic or parking areas where vehicles might linger with lights on.
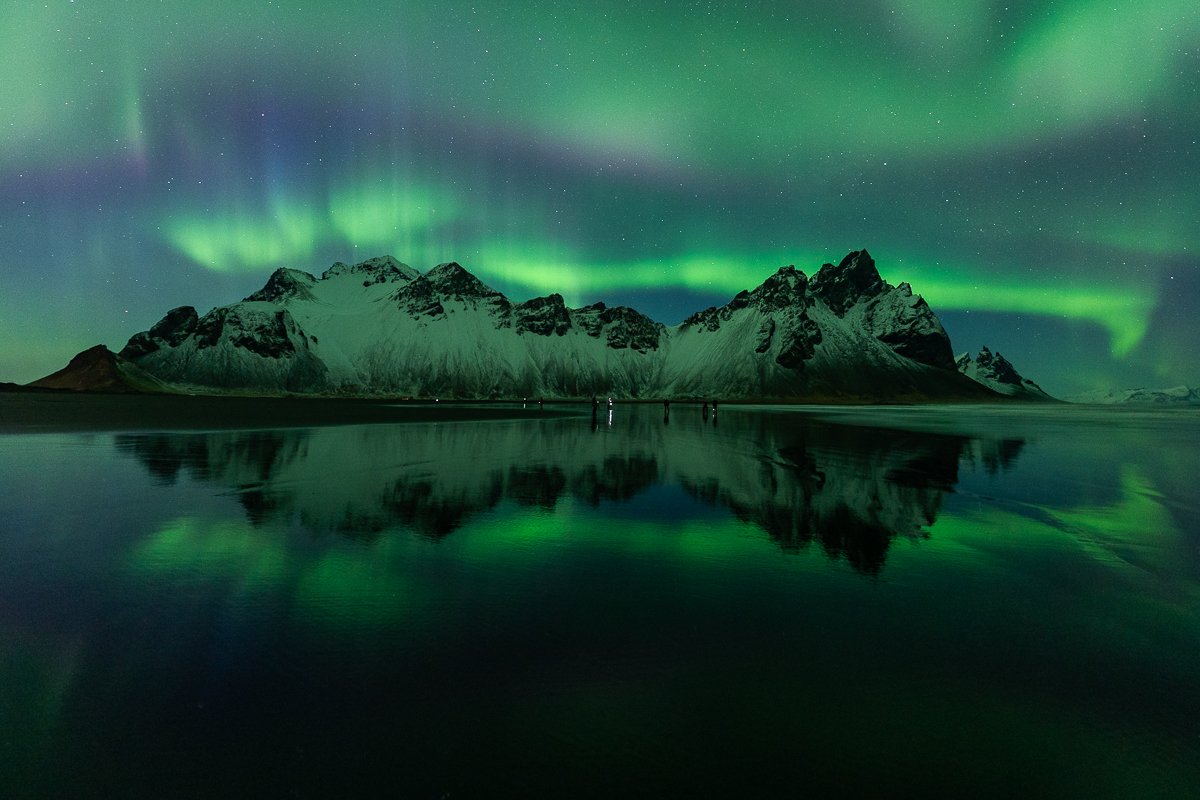
Stokksnes, Iceland. Eventually aurora decided to cooperate.
Composition
It's the most difficult and rewarding part of aurora photography. The northern lights alone rarely make a great photograph — the landscape is what makes the difference. Adding a strong subject, compelling foreground and mid-ground elements is essential for great images. And you obviously want an amazing aurora in the background.
The problem is that you don't know where in the sky the aurora will appear first or where to go next. You can stick with your strongest composition — like Vestrahorn mountain from the Stokksnes mirror beach — and wait for the aurora to cooperate. Sometimes the landscape allows you to prepare a few alternative compositions in advance and switch between them following the aurora. I usually think of at least two alternative compositions — facing west and east — which typically works well with a 14mm wide lens.
Classic landscape subjects — mountains, waterfalls, trees — work well for aurora photography, and that's what I look for when studying maps. Open water is also a desirable element. It reflects the northern lights and creates strong contrast against a snowy winter landscape.
When the moon is in the sky I prefer it to illuminate the landscape from the side. If the moon is positioned near the aurora you will most likely include it in the frame — but be aware that the moon at night always dominates and draws every shadow toward it. Not bad, but worth keeping in mind. There's also a chance the moon will be somewhere behind you, putting your own shadow in the frame — something worth checking before you set up.
Artificial light sources can occasionally add interest — a distant cabin, a campfire, a faint village glow. But any light source at night becomes a dominant element in the image. Consider its colour temperature, position, and what it illuminates before including it in your composition.
Camera settings
I always set up my initial camera settings at home. First choose RAW format to preserve more details and flexibility for editing your images later. Set your camera to manual mode — this gives you full control and allows you to adjust quickly when the aurora changes. Set white balance to 3500K for natural colours when low activity and green aurora is expected, and 4500K for high activity and colourful aurora. Switch off image stabilisation and long exposure noise reduction. Set a single shot drive mode with a 2-second shutter delay. Switch your lens to manual focus mode. Set your aperture wide open — f/2.8 or whatever your lens has.
Then set your initial shutter speed and ISO. On a moonless night I usually start with ISO 3200 and 8 seconds. If there is a bright moon I set ISO to 1600 with the same 8-second shutter speed. Start with these settings and adjust on the spot depending on the brightness of the aurora and the illumination of the landscape.
Focusing
As your lens is already in manual mode, once on location focus on a bright star. Use your camera's focus magnifier to be precise. When focused, lock the focus — some lenses have a dedicated switch, or you can fix the focus ring with masking tape. Check your focus each time you change position. If your camera has a focus peaking feature — which highlights in-focus elements on screen — use it to confirm the stars are still sharp.
Taking pictures
When the main show begins you usually face two scenarios. If the aurora is moving very fast and you want to freeze those beautiful rays, decrease shutter speed to 4 seconds, then 2, then 1 second — as long as the brightness looks sufficient on the histogram. Always check that bright aurora hasn't blown the highlights — if so, reduce ISO also.
If the aurora becomes brighter but without fast-moving rays to freeze, keep an eye on the histogram and reduce ISO instead of shutter speed — you'll get cleaner images with better detail and colours in the landscape.
If you reduced shutter speed to 1–2 seconds, or you have a dark but interesting foreground, take a few additional shots before moving to the next spot — to blend with your best aurora images in post-processing. Take a shot with a longer shutter speed — 20–30 seconds — since you're not worried about star trails this time. You can also choose whether to reduce ISO for a cleaner image or increase aperture to get your foreground in focus. I recommend reducing ISO and focusing on the foreground for these shots — this gives you a much cleaner and sharper foreground. I often regret when I don't do this — it's something I now try to make a natural part of my workflow.
Before heading out
Understanding the aurora forecast is essential — not just the Kp number, but solar wind data, cloud cover, wind, temperature, and moon. It changes the way you plan and experience aurora nights. Read the full guide: Aurora Forecast: What You Must Know.